Вся зброя в падінні короля в Destiny 2 – Dot Esports, King S Fall | Доля Вікі | Фандом
Царський падіння
Героїчні зміни
Вся зброя в падінні короля в долі 2

ДоляПадіння царського падіння повернувся до Доля 2, Даючи ще одне пальто фарби одному з найбільш знакових моментів у франшизі. Ветеранські гравці можуть очікувати, що падіння Кінга буде дуже схожим на базову версію (з деякими механічними змінами, посипаними на всьому протязі), і новіші гравці можуть вперше насолодитися улюбленим рейдом. Чи ви є Доля Ветеран або нове світло, у вас буде багато причин грати на рейді, і це ще до того, як навіть торкнутися серії рейд -зброї, яку ви можете отримати як краплі від падіння Кінга.
Осіння зброя короля несе унікальну естетику вулика, яка поєднує летальність та витонченість. Якщо їх зовнішній вигляд було недостатньо, деякі їхні комбінації приводу можуть бути достатніми, щоб викликати інтерес, а деякі можуть навіть заповнити слоти в гострої потреби замінника (наприклад, Бейн Заулі, що є гарматами сонячної руки 140 об / хв, одним з небагатьох, що не належать захід сонця). Глазур на торті – це риса Runneth Over Origin, яка переповнює журнал при перезавантаженні біля союзників.
Хоча вся зброя короля може бути дивовижною сама по собі, коронна коштовність колекції царського осені – це дотик злоби -екзотики, що повертається з Доля у подібній формі. Його унікальна прихильність, заряджена бляшкою, робить точні хіти заряджати кулю темряви. Стрілянина, яка тимчасово засліплює ворогів. Останній раунд у журналі також займе деяке здоров’я, щоб завдати додаткової шкоди, а перемога трьох цілей із дотиком від злоби відновлює здоров’я.
Ось вся зброя в Доля 2Падіння царя.
Вся нова зброя в падінні короля Доля 2
- Стіт Мерен (імпульсна гвинтівка, 390 об / хв, кінетична)
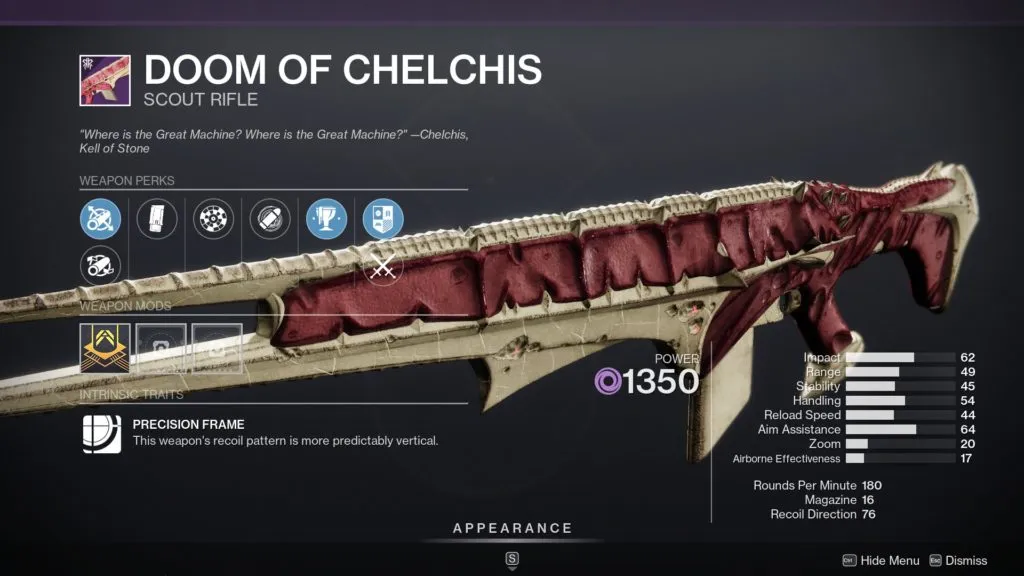
- Doom Chelchis (скаутська гвинтівка, 180 об / хв, порожнеча)
- Бейн Заулі (ручний гармат, 140 об / хв, сонячна енергія)
- Протидія Ясміну (снайпер, 90 об / хв, кінетична)
- Розрахунок Мідхи (Fusion Rifle, високий вплив, дуга)
- Термін Qullim (кулемет, 360 об / хв, стас)
- Екзотика: дотик злоби (скаутська гвинтівка, 260 об / хв, кінетична)


Педро – це сценаристка Dot Esports. Він був позаштатним письменником з 2019 року, і легенда має це, ви можете викликати його, підбираючи R-301 або запросивши його здійснити рейд у Destiny 2 (хоча він, мабуть, гірша удача, ніж команда D2 разом). Коли він не стріляє Дрегсом, ви можете побачити, як він піднімає мертвих у Діабло IV, потрапив у DMZ або провалив приховку в оплаті 3. Знайдіть його браглії на своєму Twitter @ggpedropers.
Падіння короля

Падіння короля є рейдом у Доля розширення Взято короля. [1] Рейд відбувається в Дредні, а остаточний начальник – Орікс, король взятого. [2] Він став доступним о 10 ранку PDT 18 вересня 2015 року. [3]
Вміст
- 1 Посібник
- 1.1 Зал душ
- 1.2 Накладки
- 1.3 Суд Варпріта
- 1.4
- 1.5 підвалу Гольгота
- 1.6 Голгорот
- 1.7 поршнів
- 1.8 дочок Орікса
- 1.9 Орікс, взяв король
- 3.1 скрині
- 3.1.1 скриня 1
- 3.1.2 груди 2
- 3.1.3 груди 3
- 3.3.1 броня
- 3.3.1.1 мисливець
- 3.3.1.2 Титан
- 3.3.1.3 Ворлок
Посібник []
Зал душ []
Рейд починається в Залі душ, де Fireteam зобов’язаний відкрити портал у суді Орікса, активуючи шість статуй послідовно. У цьому районі з’являться дві реліквії, на колонках, що знаходяться поза межами суду. . Решта чотирьох гравців повинні стріляти в поле, поки воно не впаде, а потім вбити ворогів, дозволяючи власникам реліквії швидко здати обидві мощі швидко в помітну статую. Після того, як це буде зроблено, ще дві реліквії нерестуються в іншому рівні, один праворуч від кімнати перед судом і один зліва, і його потрібно отримати та здати в тому ж порядку. Цей процес повинен повторюватися шість разів, кожен раз, коли мощі з’являються все далі і далі, і з більшою кількістю ворогів та силових полів між ними та статуями. Якщо реліквії не будуть отримані та депоновані досить швидко, статуя буде змістити, а послідовність буде регресувати на одному етапі.
Після того, як всі шість статуй будуть підроблені, портал суду активується і з’явиться ряд ворогів. Fireteam повинен увійти на портал для продовження. Скриня, що розграюється, знайдена відразу після проходження порталу.
Героїчні зміни
Час, після якого зменшиться статуя.
- 1 волокнистий осколок
- 3-7 черв’яка
- 1 старовинна руна
Огляди експертів GameSpot
24 листопада 2020 року
Накладки []
Fireteam повинен перестрибнути через набір колишніх платформ. Кожен гравець повинен здійснити подорож індивідуально, терміни та націлюючи свої стрибки, щоб уважно висадитися на кожну платформу.
Наступна область-це величезна кімната, в якій багато моментів пролітають заздалегідь встановлені шляхи по повітрю, періодично з’являються та зникають. Охоронці повинні стрибнути на стиковану надматок, щоб розпочати послідовність, а потім зачекати, поки вона наблизиться до іншого, і стрибає перед першою, першою однією зникає. Продовжуйте стрибати з корабля на корабель до досягнення протилежної сторони кімнати, де остаточне надматок дозволяє стрибати на тверду землю. Знову ж таки, кожен гравець здійснює свою подорож індивідуально і не може вплинути на прогрес один одного.
На далекій стороні остаточної посадкової платформи є ще одне стикне прискорення. Якщо Fireteam сідає на це, він пролетітиме через шлюз, захищений безпроблемним силовим полем. Є дві прокладки, одна ліворуч, і одна праворуч від причалу, на яких Опікуни повинні стояти одночасно, щоб дозволити вершникам пройти по полі. Прокладки лише на короткий час опустіть поле, тому рекомендується, щоб два активатори чекали, поки наказ не буде біля поля, перш ніж опустити його. Пройшовши по полю, вершники знайдуть ще дві панелі, які можуть використовуватися таким же чином, щоб провести перші два активатори через поле на другу гакбування.
Героїчні зміни
Невелика платформа зліва в середині послідовності стрибків видаляється, і там не буде задано пропуску. Усі падіння повернуть гравця на стартову платформу.
Судовий процес []
У центрі району знаходиться велика платформа для підлоги, яка пов’язана з герметичним шлюзом. З кожної сторони гліфу – дві кімнати, один червоний і один синій, які наповнені енергетичним полем, яке пошкодить незахищених гравців, і два тотеми, за якими гравці повинні стояти в усі часи.
На вході в кожну бічну кімнату знаходиться куля енергії, яка надасть ауру опікуну, який піднімає її, піднімаючи до нього. Ця аура захистить цього гравця та будь -яких інших гравців всередині нього, від пошкодження в червоних або синіх кімнатах протягом 30 секунд, під час яких вони повинні стояти під тотемом. Після цих 30 секунд аура перейде до іншого гравця, що стоїть всередині нього, а оригінальний гравець отримає бафу під назвою Смерть Смертсінгера. Гравець, який отримав цей баф, тепер повинен перейти до центрального гліфу і стояти на ньому, поки влада не виходить, коли третій гравець прибуває до тотему, щоб полегшити другого гравця і отримати від них ауру так само, як другий отримав її від перший. Розряд на гліфу частково розблокує шлюз і залишить гравця, що викидається, готовим знову прийняти ауру та продовжувати цикл. Цей процес повинен здійснювати.
Гравці повинні постійно проводити між отриманням аури, тримаючи її на тотемі, дозволяючи його взяти з них, і розрядити силу смертнику в гліф, поки руни, що вишикуються з боків шлюзу, не будуть повністю активовані, приблизно десять циклів. У цей момент повідомлення “Warpriest вважає, що ви гідні”, буде відображено, шлюз відкриється, аура та тотем механіка буде деактивуватися, і з’явиться грудна клітка.
Героїчні зміни
Механіка зустрічі незмінна. Основні лицарі з’являться під час пізніших циклів.
- 2 сформуючі осколки
- Застаріла руна
- Shell Kingslayer
- Розрахунок Мідхи
Військовий []
Палата Warpriest містить три прокладки, на яких можуть стояти гравці, і три великі пам’ятники, що несуть вуличні руни на близькій стороні, та різьблені зображення на дальній стороні. Стоячи на всіх трьох прокладках одночасно викликають Варпрієстра, який спочатку не застрахований до всіх шкоди. Велика кількість вулика також породжує в цьому районі. Після того, як більшість із них загинуть, з’явиться три основні лицарі, по одному в районі кожної колодки. Вбивство їх розпочне послідовність гліфу, яка використовується для того, щоб зробити вразливим уразливим.
По черзі, у випадковому порядку, далека сторона трьох пам’ятників освітлюється. Гравець повинен бути в положенні спостерігати за цим, оскільки вони не будуть видно з найближчого боку. Після того, як пам’ятник запалюється, опікун повинен перейти на відповідний майданчик і залишатися там, поки третя прокладка не буде активована.
Якщо це зробити правильно, опікун, який крокує на третій прокладку, отримає ауру під назвою “бренд ініціатора.”Будь -які інші опікуни, що стоять біля цього гравця. Бренд триватиме десять секунд, після чого фірмовий опікун буде вбитий, якщо вони до цього часу не вб’ють ворога, що скине таймер на десять секунд. Це скидання може бути виконано п’ять разів, надаючи тривалий час для решти команди, щоб пошкодити Варпрієру, тому скидання вбивства повинно бути здійснено в останній можливий момент. Після п’яти вбивств власником бренду, Warprest використовуватиме напад, яка вбиває будь -якого опікуна, який не стоїть у тіні пам’ятника. Найпростіший спосіб потрапити в тінь пам’ятника – це стояти на майданчику. Пам’ятник врятує команду від протирання, але буде знищений у процесі.
Більше ворогів нерестуються, і цикл повторюється чотири рази, знищуючи один пам’ятник щоразу і з позначенням заміни вулика на півдорозі. Наприкінці четвертого циклу не залишилося обкладинки, тому остаточний напад Варпріта витере команду, якщо він не був убитий до цього часу.
Героїчні зміни
Кожен раз. Лівий дасть йому відстеження кулі, ідентичні тим, хто приймає століонів. Центр дозволить йому шукати болти у відповідь на напади, ідентичні тим, хто приймає гобгобліни. Правий дасть йому кулі сліпучої темряви, ідентичні тим, що приймаються капітанами.
Інший опікун повинен взяти ауру на кожну фазу пошкодження і не може утримувати її вдруге. Військовослужбовець має більш високу кількість вогню і нерестів сильніших ворогів протягом усього бою.
- 2 сформуючі осколки
- Застаріла руна
- Протиріччя Ясміна
- Термін Qullim
- Шаленство Елуліма
Підвайн Гольгота []
Команда пробиться до темного лабіринту. Весь Fireteam повинен орієнтуватися на нього, уникаючи бездонних ям, щоб зібратися біля дверей у дальній стороні, внаслідок чого він відкривається і впустіть їх у наступну камеру. Літаючі комахи з’являються над ямами як показники свого положення.
Голгорот []
Висіти зі стелі – міхур темряви. Зйомка це призведе до того, що він капає на підлогу та викликає Голгорот і велику кількість інших ворогів.
У задній частині камери знаходиться великий чорний стовпчик під назвою Таблиця руїни. Будь -яка смерть гравця (навіть якщо він негайно воскрес) активує руну, вирізану в ній. Якщо всі шість рун активовані, планшет засліплює, а потім вбити всю Fireteam.
Гольгорот – це великий мутований огре, який постійно вистрілює свою атаку променя. Він володіє двома слабкими місцями, один на грудях і один на спині. Над ним ще шість бульбашок темряви, кожен з яких, якщо збита вниз, створить невеликий басейн світла на підлозі своєї арени, що значно збільшує шкоду, завдану йому. Гольгорот уб’є будь -якого опікуна, який стрибає вниз, щоб скористатися цим, якщо його погляд не тримає інший гравець. Захоплення його погляду здійснюється, стріляючи в спину, що призведе до того, що він зверне свою увагу на стрільця і перейде від стрільби з променем огре до стрільби, шукаючи снарядів, подібних до тих, хто приймає сотник. Гравець, який привернув свою увагу, не повинен шукати обкладинки або порушувати лінію зору Голгорот у цей момент, а натомість стояти на землі і збити снаряди, тим самим тримаючи погляд. Увага Голготта буде зосереджена на цьому гравці на короткий час, позначений таймером на HUD. За цей час решта гравців вільно збивають міхур, ввійти в яму і стріляти в груди Голготта без репресій від нього. Після того, як таймер погляду забігає вниз, другий гравець на протилежному боці району повинен захопити його погляд, щоб зберегти безпеку нападників арени; Це призведе до того, що Голгорот розвертається, щоб ще один міхур повинен бути знищений, а зловмисники переїхали до нового басейну, щоб продовжувати атакувати. Ця передача може бути зроблена шість разів, після чого більше немає бульбашок, і зловмисники повинні покинути арену. Проклята Тралл вилкне на арену, щоб ускладнити пошкодження Голготта під час цієї атаки. Альтернативно, лише один гравець може бути спеціальним власником погляду, а інші п’ять гравців пошкодили його в ямі і потребують лише одного міхура на цикл пошкоджень, таким чином уникаючи проклятого триралу, поки взята фаза.
Через короткий час бульбашки відроджуються і цикл можуть проводитися неодноразово, поки Голгорот не буде мертвим.
Коли у Голготта залишилось 35 ~ 40% здоров’я, взято буде нереститися замість вулика, що робить гольгота важче вбити. Stormcallers чудово підходить для цієї частини.
Героїчні зміни
Під час нападу на Голгорот із пулу світла, два випадкові гравці отримають налагодження під назвою “Нестабільне світло.”Ці гравці вибухнуть, пошкоджують або вбивають інших гравців поблизу (але не самі), коли їх таймери досягають нуля, і повинні залишити басейн рано, щоб відокремити себе, перш ніж це станеться.
Усі шість гравців повинні захопити та утримувати погляд Голгорот у кожному циклі (якщо він не вмирає до завершення циклу).
- 2 сформуючі осколки
- Застаріла руна
- Корольські осінні рукавички
- Броня короля осінь
- Броня царської осінньої ноги
Поршні []
Гравці повинні пройти великий простір між двома корпусами Dreadnaught. Існують платформи, витягнуті з похилих стін, які можуть безпечно стояти, уникаючи поршневих пристроїв, які постукують гравцями до їх смерті. У певних точках – електростанції, які повинні бути зайняті, щоб змусити з’являтися плаваючі платформи. Опікун повинен залишатися на кожній тарілці до тих пір. Збір Fireteam до завершальних дверей району розблокує його та дозволить проходити до наступної зустрічі.
Дочки Орікса []
Ця заключна кімната містить два смертних людей, захищені силовими полями на піднесених платформах. В іншому місці в кімнаті є чотири енергетичні таблички на п’єдесталах, які можуть бути активовані гравцями, щоб змусити напівпрозорі платформи з’являтися в повітрі. Наведення високо над однією з платформ – це іскра світла. Схід на будь -яку з цих платформ призведе до того.
Один гравець випадково буде “розірваний між розмірами”, спотворюючи своє бачення та змусити їх виглядати напівпрозорими для інших гравців. Цей гравець – єдиний, хто може пройти плаваючі платформи, викликані потужними табличками. Для того, щоб створити шлях до іскри, платформи повинні бути активовані в послідовності проти годинникової стріл. Розірваний гравець повинен досягти іскри, стрибнути на платформу, що містить смерть, який є не Кастинг заклинання та використовуйте іскру (тримаючи квадрат або X), щоб вкрасти захисну ауру смертного смерті. Це залишить смерть незахищеним, що дозволить команді пошкодити її, і захистить будь -яких опікунів, що стоять біля крадіжки від заклинання Wipe. Після того, як буде заклинання протирання, аура повернеться до свого законного власника. Потім цикл повториться з іншим смертю, що кидає заклинання та іскру в іншому місці.
Смерть повинні бути вбиті на послідовних циклах. Після того, як один буде вбитий, її аура зникне, і гравці не зможуть захистити себе від наступного заклинання протирання, за винятком вбивства решти до закінчення терміну його таймера.
Після того, як обидва смерть загинули, з’явиться на дальній частині кімнати, і в дальньому кінці кімнати з’явиться і іскра, яка викликає остаточну зустріч, коли звертається.
Героїчні зміни
Подальші цикли розпочнуться відразу після того.
- 2 сформуючі осколки
- Пункт класу короля
- Мовчання A’arn
Орікс, взяв король []
Орікс з’являється, коли гравець підходить до іскри. Після того, як гравці вбивають ворогів, які породили біля передньої частини арени, Орікс перейде до однієї з платформ і вдарить її. Це створить мот світла на цій платформі, і з землі з’являться чотири спеціальні вороги, які називаються світлими огресами, по одній поблизу кожної платформи.
Один гравець повинен претендувати на іскру, стаючи розірваним між розмірами, як стикається в смертних засобах. Їх роль полягає в тому, щоб орієнтуватися на викликаних платформах і досягти іскри, що висить над головою.
У той же час чотири інші гравці повинні викликати платформи, які потребує розірваний гравець. Як і раніше, платформи повинні бути спрацьовані в послідовності проти годинникової стрілки, починаючи з платформи, на якій з’явився мот. Однак чотири активатори також повинні вбити огре біля їхньої платформи, і переконайтеся, що так добре відстоюють від шляху, що проходить по центру району. Це пояснюється тим, що кожен огре скине сферу пошкодженого світла при вбитті, і гравці повинні уникати підходу до належного часу. Решта гравця може “плавати”, вбивство будь -яких ворогів, що залишилися, та допомагаючи активаторам у своїх вбивствах.
Коли розірваний гравець досягне накладної іскри і стверджує це, надівання пролетить через арену і доставить спеціальний лицар на ім’я судно Орікс, який пробіжить центральну стежку. Розірваний гравець повинен стрибнути вниз, щоб перехопити його, а потім утримувати квадрат або X, залежно від консолі, щоб скинути іскру і вкрасти ауру лицаря (зауважте, що для цього немає підказки на екрані, просто зробіть це, коли близько до лицаря).
Крадіжка лицаря Аура робить лицаря вразливим до всіх гравців, а також пропонує захист від пошкоджень усім гравцям, що стоять біля гравця, який вкрав ауру. На даний момент кожен гравець повинен сходитися на судно Орікса і вбити його якомога швидше. Рекомендується зробити це поблизу центру арени, щоб уникнути пошкоджених світлових сфер.
Після того, як судно Орікса буде вбито, Орікс готується використовувати свою остаточну атаку, відкривши груди, випромінюючи сяюче біле світло. Кожен гравець повинен вивантажити якомога більше вогневої сили в груди Орікса, спрямований на те, щоб мертвий центр сяючої зони обов’язково потрапила на вразливе місце. З достатньою шкодою, Орікс буде хитатися. (З недостатньою шкодою, Fireteam витере.)
Тепер пошкоджені світлові сфери, скинуті на Огри, можуть використовуватися. Чотири гравці повинні пробігти до однієї сфери і стояти біля неї близько п’яти секунд, поки повідомлення, яке підтверджує це, не з’явиться, а потім не забігає назад у ауру, яку перенесе розірваний гравець, який буде захищений від пошкодженого детонації світла. За цей час принаймні ще одного гравця потрібно продовжувати пошкодити Oryx. Поки Орікс завдає стійких пошкоджень, поки пошкоджені вогні піддаються, детонація завдасть значної кількості пошкодження Орікса. Будь -які інші нормальні вороги будуть вбиті, і Орікс здригнеться і впаде з боку району.
Орікс підніметься в кінці арени і почне стріляти від кожного гравця одразу, на що вказують білі кола, які з’являються на їх позиціях, а потім вибухають. Це може протистояти спринту навколо арени. Через короткий час заповідь припиниться.
Коли Орікс буде нижче 50% здоров’я, він більше не зробить атаку забігу після того, як пошкоджені вогні будуть підірвані і замість цього створить міхур темряви на одному кінці арени, а один за одним членом Fireteam буде телепортувати це. У межах міхура знаходиться невелика арена з туманним периметром і відтінком Орікса. Здоров’я опікуна не заряджається, перебуваючи всередині міхура. Опікуни, які ще не телепортуються в міхур, можуть допомогти тим, хто вбиває інших ворогів на арені, які спробують увійти в міхур і заважати бійці. Якщо відлуння буде переможене протягом однієї хвилини, арена розчиниться і поверне гравців до головної зустрічі.
Коли Орікс досягне здоров’я менше 1%, він з’явиться в дальньому кінці арени і відкриє груди. Fireteam повинен завдати невеликої кількості пошкодження грудей, щоб вбити його та завершити зустріч.
Героїчні зміни
Кожного разу.
Орікс повинен бути повністю пошкоджений (зі 100% здоров’я до 0%) за один пробіг; Це можна зробити шляхом детонації 16 пошкоджених світлових сфер одночасно. Після того, як Орікс був пошкоджений, кулі не повинні бути підірвані, а натомість повинні бути дозволені, поки не буде вбито достатньо Огрів, щоб виробляти 16 кульок.
- 2 сформуючі осколки
- Корольський осінній шолом
- Пункт класу короля
- Kingsbaneemblem
- Основна зброя короля Падіння
Героїчні труднощі []
Героїчна труднощі стала доступною о 10 ранку PDT 23 жовтня. Зараз вороги мають рекомендований рівень світла 300, що піднімається до 320 для остаточної зустрічі з Oryx. Як і в інших рейдах, члени Fireteam можуть не відродити один одного і їх можна повернути лише через перемогу, протирання або навички вогню Ворлок.
Грабеже []
Скрині []
Скриня 1 []
Перша скриня розташована в кінці зони стрибків з текстом, поруч із полям силою, яку необхідно опустити, щоб пройти. Зліва від цього силового поля – довгий лонжеп, що біжить по стіні, яка доступна від прохідної гакбування з ретельно приуроченим стрибком. Піднімаючись до лопата, приведе опікунів до маленьких дверей, які відкриті лише тоді, коли силове поле тримається табличками. Через двері – скриня та можливість перейти на посадкову платформу на протилежному боці.
- 2 сформуючі осколки
- 3-7 черв’яка
- 1 старовинна руна
- 1 мот світла
- 2 Спеціальний синтез боєприпасів
- 2 Синтез важких боєприпасів
Скриня 2 []
Друга скриня знайдена в темному лабіринті перед бійкою з Гольгороткою. Приховані в лабіринті – чотири великі кругові підлоги, які необхідно вступити в належну послідовність. Якщо напрямок від входу до виходу буде прийнято на північ, пластини повинні бути наступні в цьому порядку: Захід, Південний Схід, Південний Захід, Північний Схід. Це відкриє двері (знайдені, подорожуючи на вихід і прямуючи на південь), розкриваючи груди.
- 2 сформуючі осколки
- 3-7 черв’яка
- 1 старовинна руна
- 1 мот світла
- 2 Спеціальний синтез боєприпасів
- 2 Синтез важких боєприпасів
Скриня 3 []
Третя скриня знайдена в розділі платформи одразу після Гогорота. Досягнувши першої тарілки активації, на сусідній стовпці можна побачити невеликий уступ. Якщо Guardians підскочить до цього уступу, вони можуть використовувати свій привид, щоб виявити набір непомітних платформ, що знаходяться поблизу. Це призведе до нового стрибкового шляху, через кілька наборів платформ та перегляду вільно розташованої колонки, що врешті -решт веде до дверей, встановлених у похилий корпус на дальній стороні району. Скриня знаходиться в кімнаті через цю двері.
- 2 сформуючі осколки
- 3-7 черв’яка
- 1 старовинна руна
- 1 хадиій пластівці
- 2 Спеціальний синтез боєприпасів
- 2 Синтез важких боєприпасів
- Екзотична зброя або броня
Точки крапельних крапель []
- Після входу через перший портал
- Після тотемів
- Після вбивства військових
- Після вбивства Гольгота
- Після вбивства дочок Орікса
- Після вбивства Орікс
Список грабежів []
Все, отримане в нормальному режимі, падає при випадковому рейтингу атаки/оборони між 310 і 320.
Броня []
Мисливець []
- Маска Darkhollow (шолом)
- Darkhollow Grasps (рукавички)
- Darkhollow Chiton (броня на грудях)
- Darkhollow протектори (броня для ніг)
- Мантія Darkhollow (плащ)
Титан []
- Корона війни Нуммена (шолом)
- Кулак війни Нуммена (рукавички)
- Скриня Війна Нуммена (броня на грудях)
- Черевики війни Нуммена (броня ноги)
- Марк війни Нуммена (Марк)
Ворлок []
- Рот ур (шолом)
- Охорона EIR (рукавички)
- Хасма Юула (броня на грудях)
- Шлях XOL (броня для ніг)
- Облігація черв’яка (облігація)
Зброя []
- Тяжка сухоїни (автоматична гвинтівка)
- Сітт Мерен (пульсова гвинтівка)
- Doom Chelchis (скаутська гвинтівка)
- Бейн Заулі (ручний гармат)
- Розрахунок Мідхи (Fusion Rifle)
- Протиріччя Ясміна (снайперська гвинтівка)
- Мовчання A’arn (рушниця)
- Термін Qullim (кулемет)
- Frenzy’s Elulim (ракетна установка)
Інший [ ]
- Shell Kingslayer
- Kingsbaneemblem
- Оклишки для сформуючих (лише нормально)
Героїчний []
Всі грабежі, отримані в героїчному режимі, падає при випадковому рейтингу атаки/оборони між 310 і 335. Броня та зброя отримують префікс “болить” і мають більш темний вигляд, ніж їхні колеги звичайного режиму.
Окрім бойовиків, емблема, що піднімається, знизиться, коли Орікс зазнає поразки від героїчного. Орікс також гарантовано кине предмет на героїчні, тому сформуючі осколки ні скидаються, ні споживаються.
390 Світло []
390 світла версія скидає все з версії 335 світла, а також наступне:
- Malevolenceshader (Oryx)
- Xv1 Usurpersparrow (Oryx)
Режими викликів мають гарантоване падіння одного з наступних:
- Тяжка сухоїни (адепт) (автоматична гвинтівка)
- Стіт Мерен (адепт) (імпульсна гвинтівка)
- Doom Chelchis (Adept) (скаутська гвинтівка)
- Бейн Заулі (адепт) (ручний гармат)
Виклики []
Кожен виклик начальника має окрему краплю грабежу, пов’язану з ним. Крапка буде містити один предмет із звичайної колекції бабаків начальника з атакою або захистом 310, а також артефактом на 310. Якщо виклик буде завершено героїчним, крапля також міститиме болісний предмет у 320 та артефакт на 320.
Є також предмети, які можуть бути зароблені лише за конкретними проблемами.
- Емблема слуги черв’яків
- Кальцифікований фрагмент xliii, “Кінець невдалих часів”
- Пожирник світла емблема
- Кальцифікований фрагмент xliv, “суворий доказ”
- Емблеми світла та голоду
- Кальцифікований фрагмент xlv, “Я б усі їх закрив у клітинах.Що
- Agonarch KarveJumpship (лише героїчний)
Дрібниці []
- У зоні головоломки поршнів, є секретна кімната, яка містить баскетбольний майданчик Орікса. [4] Ця кімната є великодньою яйцею і не містить додаткового бабло. [5]
Галерея []

Карта льоху Гольгота, включаючи вхід, вихід, пластини та груди.
Карта зустрічі Орікса.
Вбийте початкових ворогів, які нерестуються.
Стрибайте на платформи в русі проти годинникової стрілки, починаючи з того місця, де Орікс вибиває кулак. Вбийте Огреса та підірвайте пошкоджені вогні.
Продовжуйте рухатися, щоб уникнути нападів Орікса. Не перетинайте доріжки з іншими гравцями.
Вбити тінь Орікса на арені. Вбийте Тралл, перш ніж вони зможуть пробитися на арену.
ДОВІДКИ []
- ↑ IGN (2015).
- ↑ Somxstation (2015)! Отримано 19 червня 2015 року.
- ↑ Twitter “Tweet”. Отримано 3 вересня 2015 року.
- ↑ DattodoesDestiny (2015).
- ↑ Twitter “Люк Сміт твіт”. Отримано 6 жовтня 2015 року.