


Вирішено: Oculus Quest 2 Налаштування без контролера – Форуми Meta Community – 964532, як налаштувати та використовувати мета (Oculus) Quest 2
Як налаштувати та використовувати мета (Oculus) Quest 2
І я отримую весь список властивостей.
Як налаштувати Meta Quest 2
Автоматична допомога допоможе вам швидко звузити результати пошуку, запропонувавши можливі відповідності під час введення.
- Форуми Meta Community
- Форуми VR
- Отримати допомогу
- Налаштування Oculus Quuls 2 без контролера
- Підпишіться на RSS -канал
- Позначте тему як нову
- Позначте тему як читання
- Плавати цю тему для поточного користувача
- Підписатися
- Приглушений
- Сторінка для друку
Налаштування Oculus Quuls 2 без контролера
- Марк як новий
- Закладка
- Підписатися
- Приглушений
- Підпишіться на RSS -канал
- Постійне посилання
- Друкувати
- Повідомте про невідповідний вміст
05-22-2022 03:07-відредаговано 05-22-2022 19:47
Я приніс Oculus Quest 2, який використовується з eBay. які приходять без контролера.
Тож я намагаюся налаштувати Oculus Quest 2. Я завантажую мобільний додаток і дотримуюся інструкції. Оскільки у мене немає контролера, початковий екран налаштування не дозволив мені передати початковий екран налаштування, не поєднуючи контролер. Тому я активну параметр розробника та підключусь через ADB (інструменти платформи). Я шукаю в Інтернеті і знаходжу щось на зразок
adb -s оболонка getprop
І я отримую весь список властивостей.
Хто -небудь може сказати мені, яке значення мені потрібно змінити або потрібно додати властивості системи, щоб річ OCULUSE/ANTERANND, що робиться початкове налаштування контролера. Я вже налаштував контролер Xbox.
Оскільки є опція відстеження рук, тому я хочу використовувати опцію відстеження рук, я думаю, що можу його активувати, використовуючи мишу.
. Цей розділ є лише в тому випадку, якщо ви експерт та ноу-хау для роботи з ADB та Shell та Android. Не питайте мене, чому я не купую контролер, оскільки він недоступний, і я хочу налаштувати пристрій без нього.
Якщо ви хочете, то я можу додати список властивостей тут пізніше.
Чи є у вас будь -які пропозиції щодо налаштування окулуса без контролера?
Як налаштувати та використовувати мета (Oculus) Quest 2
Джеремі Лаукконен – автомобільний та технологічний письменник для численних великих торгових публікацій. Не досліджуючи та тестуючи комп’ютери, ігрові консолі чи смартфони, він залишається в курсі безлічі комплексних систем, які живлять електромобілі акумулятора .
Оновлено 3 листопада 2022 року
- Університет західних губернаторів
Райан Періан – сертифікований ІТ -фахівець, який має численні ІТ -сертифікати та має досвід роботи в ІТ -індустрії 12+ років.
У цій статті
Перейти до секції
Що знати
- Після того.
- Завантажте та налаштуйте додаток Meta Quest на своєму смартфоні та увійдіть у свій обліковий запис Facebook/Meta.
- Підключіть свій квест 2 до Wi-Fi, встановіть межу опікуна та ознайомтеся з контролерами.
Ця стаття пояснює, як налаштувати та використовувати Meta Quest 2, від Fresh Out of the Box до занурення у свою гру першої віртуальної реальності (VR).
Розкриття та знайомство з мета (Oculus) Quest 2
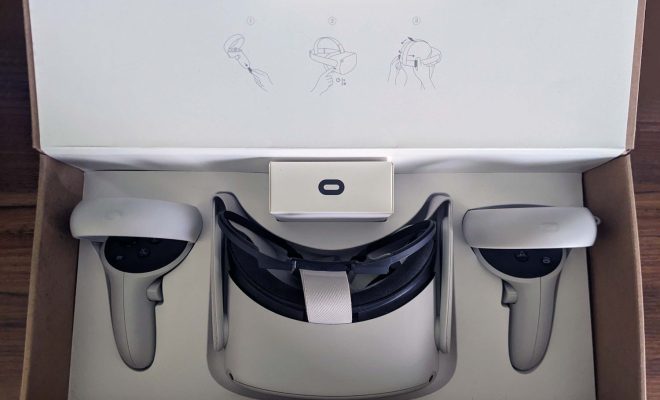
Quest 2-це один із найбільш зручних для користувачів VR-досвіду, коли-небудь робився, і він постачається з усім, що вам потрібно прямо в коробці. Коли ви вперше виймаєте ковзанку та відкриєте коробку, ви знайдете гарнітуру Quest 2, що вища посередині разом з розпіркою та сенсорними контролерами з обох боків.
:max_bytes(150000):strip_icc()/oculusinbox-83daf883b7de4aafa76c70aacc909b5a.jpg)
Гарнітура Quest 2-це як гарнітура VR, так і компактний комп’ютер, все в одному, саме тому ви можете використовувати її як з ПК, готового до VR, і без нього. Він носять як набір негабаритних окулярів, тоді як контролери тримаються як по одному в кожній руці. Третій предмет, який ви бачите відразу після відкриття коробки, – це розпір, який вам може знадобитися, якщо ви носите окуляри. Щоб встановити його, вам потрібно висунути піну та пластику для обличчя з гарнітури, вставити її в гарнітуру, а потім замінити обличчя для обличчя.
:max_bytes(150000):strip_icc()/oculusspacer-e14fe07ca4e3405fba1df2454d40c1b1.jpg)
Щоб підготувати контролери, шукайте на кожній ручці невеликі пластикові вкладки та витягніть їх. Контролери поставляються з вже встановленими батареями, тому витягування вкладок призведе до того, що вони живлять.
:max_bytes(150000):strip_icc()/touchcontrollerbatterystrip-eab5182fd9554798b4d576eea68bb9ea.jpg)
Тепер, коли ви не скасували свої Quest 2, вам захочеться підготувати його до процесу налаштування. Щоб дістати куля, виконайте ці кроки:
:max_bytes(150000):strip_icc()/questpowerbutton-1b2d4accf18c481399cc07dae05067b6.jpg)
- По -перше, увімкніть гарнітуру Quest. Натисніть і утримуйте кнопку живлення приблизно на дві секунди, поки не почуєте шум з гарнітури, а потім відпустіть.
:max_bytes(150000):strip_icc()/touchcontroller-1edfbee8746b406f8159c4a0dafac925.jpg)
Стисніть тригери на своїх контролерах, щоб поєднати їх з гарнітурою.
Використовуйте контролер, щоб вказати на параметри, і вичавити спусковий гачок вказівним пальцем, щоб зробити вибір.
Завантажте та встановіть додаток Meta Quest
Поки ваша гарнітура виконує будь -які необхідні оновлення, ви можете скористатися можливістю завантажити та встановити додаток Meta Quest на своєму телефоні. Додаток доступний як для Android, так і для iOS, і він дозволяє вам керувати своїм досвідом роботи, коли ви не в VR. Він включає магазин, де ви можете придбати нові ігри Quest, і це також потрібно, якщо ви хочете використовувати батьківський контроль зі своїм квестом.
Ось як налаштувати додаток Meta Quest:
- Завантажте та встановіть додаток Meta Quest на свій телефон.
Якщо у вас вже є обліковий запис Oculus, ви можете натиснути Мати рахунок Oculus? Якщо у вас немає жодного з цих облікових записів, торкніться Зареєструватися Для створення облікового запису.
:max_bytes(150000):strip_icc()/Continue-980a771dd9a24248993ad83aac0e2578.jpg)
Поступово Продовжуйте як (ваше ім’я).
Якщо у вас є існуючий обліковий запис Oculus, торкніться Мати рахунок Oculus? Увійти .
:max_bytes(150000):strip_icc()/WelcometoOculus-a08531a5e2184c56b47d48f88e760fe9.jpg)
Поступово Продовжувати.
:max_bytes(150000):strip_icc()/Setupprofile-bd9d8a6c91674f51a4a192043f25f1c2.jpg)
Виберіть бажані параметри конфіденційності та торкніться Продовжувати.
:max_bytes(150000):strip_icc()/Qwest2-a7fb6b2467a74a52b441ebe96d003e5f.jpg)
Поступово Квест 2.
Коли ви закінчите налаштування гарнітури, ви можете з’єднати свій Quest 2 на свій телефон для доступу до батьківських елементів управління, потокової передачі та інших параметрів.
Як налаштувати мета (Oculus) Quest 2
. Якщо ви надягаєте його і побачите, що Quest 2 все ще оновлюється, покладіть його надійно на стіл або стіл і поверніться пізніше.
Ось як налаштувати квест 2:
- Розмістіть гарнітуру Quest 2.
Якщо ви носите окуляри, утримуйте гарнітуру перед окулярами і обережно натисніть на обличчя. Ваші окуляри не повинні контактувати з лінзами гарнітури. Якщо здається, що це буде проблемою, вам потрібно буде використовувати включений прокладок.
:max_bytes(150000):strip_icc()/oculusstrap-777b9d7d96be415d889a0ef83b48031a.jpg)
Щоб забезпечити гарне пристосування, скасуйте передній ремінь на липучках, або потягніть його вчити, якщо ремінь занадто вільний або потягніть на задню частину смуги.
:max_bytes(150000):strip_icc()/oculusadjustlens-67d60a3854d24b4e8f7b8b1b750c5474.jpg)
Якщо зображення, яке ви бачите через гарнітуру, розмито, знімайте його, візьміть сірий пластик, який оточує одну з лінз, і обережно натисніть на його до іншого об’єктива.
Існує три різні позиції об’єктива, тому експериментуйте, щоб побачити, що найкраще підходить для вас.
Як встановити межу опікуна
Оскільки Quest 2 – це окрема гарнітура VR, ви можете використовувати її кількома різними способами. Ви можете використовувати його, сідаючи нерухомо, і в цьому випадку він відстежуватиме рух голови, але не рух вашого тіла. Ви також можете встановити межу опікуна або безпечну ігрову зону, і в цьому випадку ви зможете ходити по VR, придушити, сісти, встати і в іншому випадку рухатися по віртуальному простору, рухаючись у реальному світі.
Якщо у вас немає прикордонної установки, або ви перемістите свій Quest 2 на нову область, вам буде запропоновано створити нову межу, перш ніж грати в гру.
Ось як налаштувати межу Guardian Quest 2:
- Знайдіть у своєму будинку зону з адекватним простором, щоб грати в свої ігри.
Простір повинен бути без перешкод і що -небудь на підлозі, на яке ви могли б переїхати.
Якщо сітка, здається, плаває, виберіть Скинути, присідайте вниз і торкніться підлоги своїм контролером.
Безпечна область, яку ви вибрали, не повинна мати жодних перешкод або небезпеки для відключення в ньому.
Рухайтеся занадто близько до краю вашого ігрового простору, і сітка з’явиться як попередження. Якщо ви продовжуєте виходити за межі сітки, віртуальний світ буде замінений на сірий вигляд вашої кімнати, щоб ви випадково не натрапили на щось чи подорожувати.
Використання контролерів Quest 2
Quest 2 поставляється з двома контролерами Oculus Touch, здатними відстежувати ваші рухи, використовуючи ту саму технологію, яку використовує гарнітура.
Ці контролери дуже функціонують як звичайна консоль або геймпад ПК, і вони включають дві аналогові палички, чотири кнопки обличчя, два тригери, дві кнопки зчеплення, кнопка меню та кнопка Oculus.
Окрім цих кнопок, контролери також відстежують положення ваших рук, що дозволяє підбирати та маніпулювати предметами в деяких іграх. У інтерфейсі Oculus Quulus 2 ви використовуєте контролери для вказівки на об’єкти меню та вибираєте їх, натиснувши кнопку або тригер.
:max_bytes(150000):strip_icc()/PXL_20220804_195741183.MP-410765e62b874bd3beaa62b93f2ee665.jpg)
Ось що роблять кнопки на сенсорних контролерах:
- Паличка. Залежно від гри, ви, можливо, зможете рухатись або відрегулювати камеру за допомогою цих паличок, хоча більшість ігор дозволяють змінити вигляд камери, перемістивши голову.
- Спрацьовує: Ці кнопки відпочивають природним шляхом під вашими індексними пальцями. Вони можуть вибрати пункти меню в інтерфейсі Quest 2 та виконувати різні операції в іграх. За підтримки, ви можете вказати на віртуальний палець, піднявши вказівний палець від тригера.
- Кнопки зчеплення: Ці кнопки знаходяться на ручках і спрацьовують середнім пальцем. Ігри, як правило, використовують ці кнопки, щоб дозволити вам схопити об’єкти віртуальною рукою, або скласти та розширити пальці неіндексу.
Примітка. Деякі ігри дозволяють зробити кулак, торкнувшись кнопки зчеплення, так і спуска. - Кістка: Ці кнопки виконують різні функції в різних іграх. У інтерфейсі Quest 2 вибирають речі, а B і Y повертають вас до попереднього меню.
- Кнопка меню: Ця кнопка зазвичай відкриває меню.
- Кнопка окулуса: Натискання цієї кнопки відкриває панель інструментів або універсальне меню. Тримаючи кнопку, що триває свій погляд у VR.
Ви готові грати у VR
Ваш квест 2 готовий до роботи, у вас є додаток Meta Quest на своєму телефоні, і ви розумієте, як працюють елементи управління. Це означає, що ви готові вскочити у свою першу гру. Ви можете почати, випробувавши кілька безкоштовних ігор, таких як Horizon Worlds або VR Chat, щоб відчути, як працює VR, або стрибнути в сучасну класику, як Beat Saber.
Для безпеки подумайте почати з ігор, які позначені як Зручний У магазині Quest 2 і робити регулярні перерви. Якщо ви почнете відчувати почуття дискомфорту, знімайте гарнітуру, сідайте і зачекайте, поки вам стане краще.
Ось як почати грати в свою першу гру VR. Переконайтесь, що ваші гарнітури та контролери заряджаються.
:max_bytes(150000):strip_icc()/Oculusbutton-8a5565b0535746f980ba5f9ef8b09eb6.jpg)
- Натиснути Кнопка окулуса на правому контролері, щоб підняти панель інструментів.
:max_bytes(150000):strip_icc()/Store-9036c6514590423c87faad506e00698f.jpg)
Виберіть значок магазину (корзина).
:max_bytes(150000):strip_icc()/Game-e47652dee04c43a88ddc22c61c4d2f2c.jpg)
Знайдіть безкоштовну гру або ту, яку ви хочете придбати, та виберіть її.
:max_bytes(150000):strip_icc()/Get-b620c44ffa884fc0bdd4895d980ae530.jpg)
Або виберіть Отримати для безкоштовної гри або ціна для преміум -грі та завантажте її.
:max_bytes(150000):strip_icc()/Start-84d6a8489e244858a8be8419f51e12b9.jpg)
Зачекайте, поки гра завантажиться та встановить, а потім виберіть Почати.
Надалі ви можете отримати доступ до всіх своїх ігор з бібліотеки.
:max_bytes(150000):strip_icc()/6-ffd307449b874b0791d68719eab6ea2d.png)
Ви в грі.
.
Як купити ігри для Oculus Quest 2?
Щоб придбати нові ігри на мета (Oculus) Quest 2, доступ до магазину Quest 2, натиснувши Кнопка окулуса значок магазину з панелі інструментів. Якщо ви додали метод оплати, ви можете придбати ігри безпосередньо в магазині Quest 2, не залишаючи VR.
Як мені кинути Oculus Quest 2 на телевізор?
Щоб кинути з мета (Oculus) Quest або Quest 2 гарнітури до телевізора, живити на телевізорі, надіти гарнітуру та увімкнути його. Обраний Розподіляти > Кадати. Виберіть свій пристрій і натисніть Наступний. Ви побачите повідомлення про те, що розпочався кастинг.
Як я можу скинути фабрику Oculus Quest 2?
На заводські скидання мета (Oculus) Quest 2, натисніть і утримуйте влада обсяг Кнопки на гарнітурі. Використовувати Кнопка гучності висвітлити Заводські налаштування; натиснути Кнопка живлення Щоб вибрати його. Використовувати Кнопка гучності висвітлити Так, стирання та скидання фабрики, а потім натисніть Кнопка живлення .
Як налаштувати та використовувати мета (Oculus) Quest 2
Meta Quest 2 – це гарнітура віртуальної реальності, яка може революціонізувати спосіб взаємодії з іграми та іншими програмами. Однак, як і будь -яка технологія, це може здатися важко налаштувати та використовувати вперше. .
Крок 1: Підготуйте свою гарнітуру Meta Quest 2
По-перше, переконайтеся, що ваша гарнітура заряджається, підключивши зарядний кабель до порту USB-C, розташованого біля правої сторони гарнітури. Зачекайте, поки пристрій повністю заряджається, що займе приблизно 3 години. Після зарядки від’єднайте кабель і надішліть гарнітуру.
Крок 2: Завантажте додаток Meta Quest 2
Перш ніж ми розпочнемо налаштування самої гарнітури, завантажте додаток Meta Quest 2 на свій смартфон або планшет. Ви можете використовувати цю програму для управління своїм досвідом VR, знайти та придбати вміст у бібліотеці та ділитися своїм досвідом з іншими.
Крок 3: З’єднайте Meta Quest 2 зі своїм смартфоном
Натисніть кнопку живлення, розташовану в правій частині гарнітури, утримуючи її приблизно 2 секунди, поки світлодіодне світло не увімкнеться. Увімкніть Bluetooth на своєму телефоні та шукайте нові пристрої Bluetooth. Meta Quest 2 повинен з’явитися у вашому списку доступних пристроїв. Клацніть на нього і зачекайте, поки процес спарювання завершиться.
Крок 4: Підключіться до Wi-Fi
Підключення до Wi-Fi-це вирішальний крок у процесі налаштування; Без підключення до Інтернету, Meta Quest 2 буде обмежений лише офлайн -вмістом. Перейдіть до налаштувань, а один раз там натисніть на меню Wi-Fi. Виберіть відповідну мережу та введіть пароль.
Крок 5: Налаштуйте систему Guardian
Система Guardian – це функція програмного забезпечення, яка створить віртуальну межу, в якій ви можете вільно рухатися навколо. Щоб налаштувати його, спочатку знайдіть призначену ігрову зону, яка не містить меблів, домашніх тварин та інших небезпек. Після того, як ви його відсортуєте, натисніть на параметр “Налаштування Guardian” у меню Налаштування. Ви будете керуватися процесом окреслення меж ігрової зони.
Крок 6: Створіть або посилайте свій обліковий запис Oculus
. Ви можете створити його всередині програми або на офіційному веб -сайті Oculus. Ви також можете зв’язати існуючий обліковий запис Oculus, ввівши свої облікові дані.
Крок 7: Вивчіть магазин
. Від ігор, додатків та відео, до соціального досвіду, магазин-це ваш єдиний магазин для всього досвіду VR.
Крок 8: Налаштуйте свій досвід
. .
Висновок
Meta Quest 2-це пристрій, що змінює гру, і за допомогою цих кроків ви можете налаштувати його та насолодитися зануреним досвідом. Після того, як ви підняли гарнітуру, експериментуйте з величезним наявним вмістом та дізнайтеся, що підходить для ваших смаків. .